Monday, December 19, 2016

Tech News: Amazon makes it's first drone delivery in England

We've all seen the commercials.
Amazons cute little drones (I prefer the term quad-copter myself) delivering a package to an Amazon Prime customer within minutes of ordering on the company's web page.

The online retail giant conducted it's first drone delivery test on December 7th in Cambridge England. Delivery to the customer took just 13 minutes from the customer ordering online, and the drone flight from the company's fulfillment center, to the customers residence. The delivery falls under Amazons "Prime Air" trial.* In case you're wondering the order involved an Amazon Fire Stick and a bag of popcorn ;-D


Check out Amazons Prime Air Trial web page for more info on this cool delivery service.

* Amazon is only currently testing the drone delivery service in England. Currently FAA regulations prohibit commercial flights in the US, however Amazon is working with the FAA to seek it's approval in the US. 

Wednesday, December 14, 2016

How to: Erasing the past with CTL+Z in Windows

It's bound to happen. You just downloaded an important file and you move the file from the Downloads folder to your Documents folder.
Whoops...That wasn't your Documents folder! 

Instead of spending the next 15 minutes looking for that rascal. Use this rarely used keyboard shortcut that undoes your last action - CTL+ Z thereby "erasing the past".
Too bad there isn't a CTL+Z for things we've done in real life!

Sunday, December 4, 2016

How to: Recovering a lost Wifi password

Okay....so you forgot your Wifi password but you need it for your laptop.

You know wrote it down on that sticky note but that has long disappeared. You still have access from your phone, but all you see is a bunch of "*******".

Accessing your wifi password

First, before going full frantic mode, check the modem that your ISP provided for you. Usually WiFi passwords are listed directly on the Modem from your Internet Service Provider. If that's not the case you can always reset your Wifi password by accessing your routers web page

But that's alot of work.....you can actually view your wireless password within a configuration file on your Android phone......one caveat....you phone must be rooted.

If you've rooted your phone, open a file manager. If you don't have one, download a file manager similar to X-Plore or Astro from the Play Store.

Open your file manager and locate data/misc/wifi and find the file wpa_supplicant.conf. If you're unable to find it try locating wep.supplicant.conf. 
It's simple text file, so once you tap it your notepad should open it.

This file lists the current networks you have saved on your phone as well as your passwords to the networks.

Saturday, December 3, 2016

Tech News: Over 1 million Android phones hacked

Over 1.3 million Google accounts, which include photos, documents and email have been accessed by hackers by way of apps which were not available on Google Play Store.

Checkpoint, a cyber security firm, has named the hacking campaign "Googligan" and has set up a website named "Googligan Check Point" for consumers to determine if their Google accounts have been hacked.

The infection begins when a user downloads and installs a Gooligan-infected app on a vulnerable Android device, or by clicking on malicious links in phishing attack messages. Checkpoint states the code is targeted towards Android devices which have The Jelly Bean, Kit Kat, and Lollipop versions of Googles operating system.


Google has since removed the apps from thier Play Store, which contain the malicious code. However the attacks are still prominent as 3rd party websites still list apps that contain malware.


Android users have the option to download unofficial apps from 3rd party vendors and websites, but it is advised not to due to incidents like these.

Tuesday, November 22, 2016

Windows as a service - what does it mean for you?

It's been a tradition of sorts with Microsoft releasing a new version of Windows every few years and the incremental security updates to that version. Then as a new release of Windows was to occur, updates to the previous version would slowly come to an end. And the support of the previous versions would end along with the *lifecycle.

For more information on Windows Lifecycles check out Microsofts Lifecycle page. You'll find that Windows 10 support and updates are N/A and have no end date.

When Windows 10 was released last summer, it was a pleasant surprise. The return of the Start Menu and Cortana, among other wonderful features. Of all the questions many users had the most popular would be "What will the next version of Windows look like?"

That question will very likely become obsolete (a word I don't like using), as Microsoft Vice President of Windows and Devices Group Terry Meyson explained.

"This is more than a one-time upgrade: once a Windows device is upgraded to Windows 10, we will continue to keep it current for the supported lifetime of the device – at no cost. With Windows 10, the experience will evolve and get even better over time. We’ll deliver new features when they’re ready, not waiting for the next major release. We think of Windows as a Service – in fact, one could reasonably think of Windows in the next couple of years as one of the largest Internet services on the planet."

What does this mean exactly? It means Microsoft no longer will release new versions of Windows. Instead the consumer will receive constant updates with new or improved features of Windows ....and this is the best part....at no cost! No more XP, Vista or Windows 7....just Windows!

Essentially you'll always be getting access to the latest operating system. The cons? As OEMs such as HP, Dell and Toshiba manufacture their latest PCs with the newest hardware there will likely be driver and compatibility issues until Microsoft catches up with the updates.

So there you have it.....there won't be a Windows 11 or Windows 2018....you'll always have the latest version of Windows on your computer....free. ;-)

The official Microsoft technet blog here.


Saturday, November 12, 2016

Rooting, Unlocking and Jailbreaking - What's the difference?

Note: This article describes the differences between the three. The steps to Root an Android, or "Jailbreak" an Apple iOS device are very detailed and will be covered another day. There are plenty of How To's on Youtube and other sites as well.

I come across many people who use those terms interchangeably. I head a friend a few months ago say, "I'm going to unlock my iPhone so i can tweak the settings". I looked at him and had to laugh, but cleared things up for him
All three describe different procedures on different cell phones.

Unlocking:
All unlocking means is to allow a device which was previously restricted to a specifc carrier can be "unlocked" to be used with another carrier.......Let's say you're not happy with your current carrier and you want to switch to another phone company because they have a better deal. Whoever your current carrier is, call their customer service to have the phone unlocked.


Usually carriers place a few restrictions in order to have a phone unlocked. The phone must not be reported stolen or lost (a clean IMEI). It must be paid for. It can't be on a payment plan or contract.

It's much easier to have a carrier unlock a phone today than it was 5 years ago.  In 2015 a federal bill was passed requiring carriers to unlock consumer phones if they no longer were under the standard two year contract.

Jailbreaking:
Jailbreaking is a term known among iOS consumers. When you "jailbreak" an Apple device, you're bypassing software and security restrictions which Apple has placed on the device. Unfortunately Apple frowns upon "jailbreaking" as well and deems the warranty of your device void if you do, however it is legal to do so in the U.S. In other countries not so.

When you "jailbreak" an iPhone or iOS device and it allows root access to the iOS file system, so applications, extensions, and themes unavailable through the official Apple App Store can be downloaded. Jailbreaking allows you access to apps which Apple doesn't authorize or isn't available at the Apple Store.


Rooting
The Android operating system already allows you to "sideload" apps. (To install from 3rd party sites other than the Play Store) Android gives you free rein in that territory.
When you "root" an android device you access administrative functions and system files and folders.

You might be saying "Well......so what?...what does that do for me?"

When you root an Android device, you open an entire new world of ROM's; third-party systems and not only with the original ROM.
Custom ROMs replace the pre-installed version of Android on devices. Some Roms allow certain performance tweaks such as adjusting processor speed.
Simply Google 'Android Rom's" and you'll see what I mean.

So there you have it.
Jailbreaking is basically bypassing Apples security restrictions on an iOS device (iPhone, iPad...etc) in order to download and install apps which are not listed in the App Store. Rooting gives an Android user administrative access to system files which allow the user to install new Android Rom's (custom versions of Android)

Friday, November 11, 2016

How to: The difference between Sleep & Hibernate on a Windows machine

You're in the midst of typing an email up and it's dinner time. You're not ready to send that email off just yet, and you don't want to shut down the machine....so you click the start menu and send in off to Sleep....or should you use Hibernate instead?

What's the difference?

SLEEP 
Using Sleep in Windows uses low power. The machine is still on, and any programs that are open will remain open. It's similar to pausing a DVD player. *Turn back on Windows by moving the mouse, tapping a key on the keyboard or opening the lid if it's a laptop. 
 *If it's laptop and the battery is low during Sleep, Windows may shut down to prevent damage to the battery.

HIBERNATE 
The Hibernate option is specifically designed for laptops where battery drain would be a concern. When you place a PC in Hibernation, the current programs and apps stay open, any open documents and files are saved and the computer shuts down. 
When you turn back on your system, you'll start back right where you left off. Unlike Sleep Mode, Windows completely shuts the PC down so it's slightly slower getting back to your PC. 

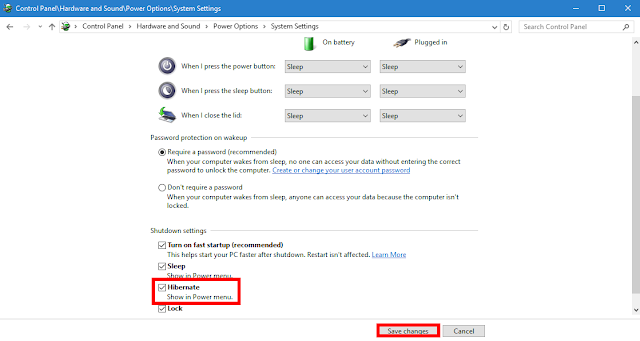
The Hibernate option in Windows 10 should be available in the Power Menu, but if it isn't it's fairly simple to add it.

Enabling Hibernate option
In the Search bar, type Power Options. A Control Panel named Power Options should be listed. Click that. 

When the Control Panel open click "Choose What The Power Buttons Do"


At the top of the next screen, select and click "Change Settings That Are Currently Unavailable"


Scroll down on the next page and click the box to the left of "Hibernate" and Save Changes. That's all it takes! 
Now when you click the power button at the Start Menu, you'll have the option to use Hibernate


Monday, October 31, 2016

How to: Tracking your package or shipment via Google

This comes way of Googlesystem Blog.
 Google has created a new card for an easy simple way of tracking packages you've sent out.
The card is extreemely simple. You just enter the tracking number in the field.


No need to goto the websites of USPS, FedEx or UPS! Check it out here: Googlesystem Blog

Try it out!

How to: Locate a Lost Or Stolen Phone

Losing your phone can be a turn any everyday situation into a frantic panic.
You've just got home running errands, and now you realize you can't find your phone. Thoughts are going thru your mind. Is it on the counter at the gas station? Did I leave it at the store?

GPS technology has made it easier to locate devices and that includes cell phones. There are many apps on the Play Store which are available to locate cell phones but this article will list two of the leading brands.

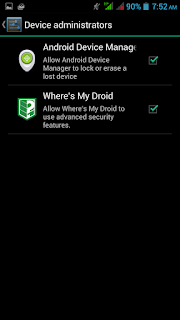
As a reminder - the apps covered here will need to be installed on your phone first. Simply install the app and ensure it is active on your phone under Settings-Security-Device Administrators. Any app which uses the security features within Android should be listed here. Ensure the app is checked.

Android Security Menu
Android Device Admin

Where's My Droid
Where's My Droid (WMD) has been around for a few years now and the app has become much more streamlined and easier to setup since I started using it in 2013. It's jam packed features include ring, camera, lock and wipe. There are two components to WMD -the app itself which is installed on your phone and the desktop utility.

Wheres My Droid


Using a friends phone, you can also send a special text to your phone so it can ring at full volume, even if your phone is set to vibrate. Taking pictures, activating GPS, locking and wiping can be done the same way; using a special text from another phone.
You can locate your phone by logging into the desktop utility at
https://commander.wheresmydroid.com/
Download the app itself at the PlayStore (WMD is not available for iPhone/iPad)

Android Device Manager
Google has it's own utility to locate lost/stolen android devices, however it's not as feature rich as WMD. One drawback with Android Device Manager is that GPS/Location Services must already be on before you lose the phone as opposed to WMD where you can turn on GPS with a text.
Still...if the only thing you need to do is locate, lock or wipe your phone or tablet, Android Device Manager will do the job just fine.

As a reminder - the apps covered here will need to be installed on your phone first. That being said head over to the Play Store and search for Android Device Manager.
Simply install the app and ensure it is active on your phone under Settings-Security-Device Administrators.
Any app which uses the security features within Android should be listed here. Ensure Android Device Manager is checked.
Ensure GPS/Location Services is turned on.

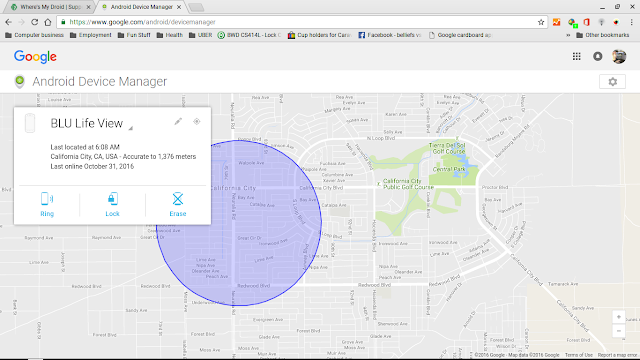
Locating your phone is simple. Just log into your Google account, and head over to https://www.google.com/android/devicemanager.
A map will be displayed and Google will attempt to locate your phone. From here you can also Lock and Wipe your phone/tablet as well.

Android Device Manager Location


In the long run it's a good thing to be prepared before you lose your Samsung, LG or HTC. 

Installing apps such as Where's My Droid or Android Device Manager may save you alot of heartache if you ever lose your phone.

Thursday, February 4, 2016

How to: Replacing A Broken Laptop Screen

Whether it's cracked or has one too many blown pixels, a broken laptop display can stop you dead in your tracks. But with the right tools, a little technical know-how, and a bit of patience you can replace a damaged LCD.


Broken laptop screen
Note: In this article, I show you how to replace the screen on an Asus UL50V notebook, which has an LED-backlit LCD.

Depending on the make and model of your laptop, the internal hardware and specific steps may vary. The general process however, should be the same.


Should you try this fix?
If accidental damage is covered under your laptop's warranty, don't do this fix yourself. Get the laptop repaired under the warranty.

Lastly, understand that if you follow the instructions in laptop screen replacement, you do so at your own risk.  I am not held responsible for injury, damage, or loss of data.

Getting a replacement screen and tools
To begin your fix, you'll need a few simple tools and a replacement LCD screen. For tools, I recommend a screwdriver with a variety of small bits, such as a Phillips #00 and a Torx T5. It's also a good idea to have a few thin metal blades or plastic spudgers. These are really handy for removing the trim that surrounds the screen.

As for the replacement LCD, you should be able to buy one either from the laptop manufacturer's authorized parts dealer or a third-party supplier. Depending the screen, they usually cost between $50 and $150 dollars—more if it's a high-end display or you buy an OEM replacement. Regardless, you'll want to buy a new screen that matches your broken one exactly. The only sure way to do this is to remove the broken one.

1. Remove the screen bezel
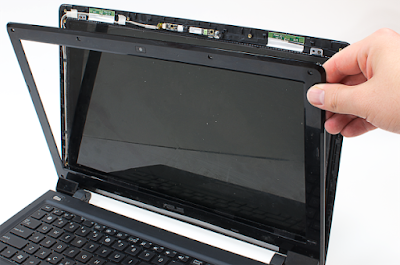
After disconnecting the power supply and removing the battery, carefully examine the bezel around the screen. You'll need to remove this bezel to access the screws that hold the LCD panel in place.
On this laptop, several rubber cushions hide screws, which hold the bezel in place. I'll need to remove these cushions and the screws that are underneath.


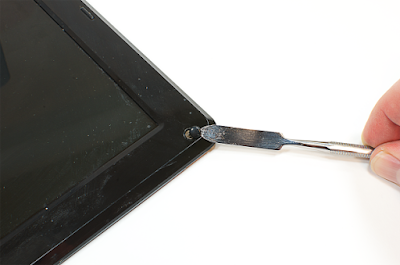
With the hidden screws removed, I used a thin metal blade to pop loose one of the bottom corners and worked my way around the bezel with a plastic spudger.


Note: Your laptop may not have cushions or hidden screws. The bezel may simply snap onto the lid or be held in place with double-side tape. Just, adapt my instructions to fit your specific laptop.
Regardless of how you do it, you'll need to completely remove the bezel.


2. Remove the broken LCD panel
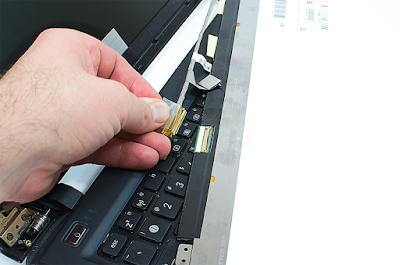
With the LCD's mounting brackets exposed, you can remove the screws that secure it to the lid. Then rest the display front-side-down on the case and disconnect its cable.


If your laptop was made before 2010 and has a LCD with fluorescent backlights, it will likely have two cables. But as this is an LED-backlit LCD, it only has one.


Now, locate the manufacturer's label and note the model number. Using this information you should be able to buy an exact match for your broken screen.

3. Install the new LCD panel
Once your new screen arrives, unpack it and make sure it matches the old one.


If the dimensions, mounting brackets, and connector all match, you ready to install the screen. Connect the new panel to the cable, position the panel in the lid, and secure it using the appropriate screws.


4. Test the new LCD panel and reinstall the bezel
Before reattaching the bezel, it's a good idea to test the new panel. Reconnect the battery and power cable and turn the machine on. If the display works, you can reattach the bezel and any external screws and rubber cushions. The repair is now complete.

As fixes go, this one isn't too tough, but it does take a little patience and planning to make sure you get the right replacement screen.

Original article at Techrepublic

What is Crossfire?


Previously I worked on a customers system that had two ATI 4800 GPU's using Crossfire. It's a technology that ATI developed so up to four graphics cards can be used in a single computer to improve graphics. Crossfire has the advantage over Nvidias SLI (Scalable Linked Interface) where you don not need to have both cards the identical GPU. 

You'll usually only find systems that use Crossfire or SLI in high end gaming machines. The customer I recently visited had a quad core AMD processor running 3.2ghz, 8gb ram, 600gb HD, and CCL lighting galore in the case.....very nice.


Monday, February 1, 2016

How to: Have Cortana use Google instead of Bing in Windows 10

Windows 10 has a pretty amazing search assistant called Cortana. She comes hand in hand with Bing, as Bing is owned by Microsoft. So every search result that comes back is from Bing. That's all fine and dandy but if you're a fan of Google that's a big no-no.

Here's how you can force Cortana to use Google instead of Bing.

1. Navigate to Settings. You can get there from the Start menu.
2.Select System.
3. Click Default apps in the left pane.


4. Click Microsoft Edge under the "Web browser" heading. ...

5. Select the new browser (ex: Chrome) in the menu that pops up.


6. Great....Now that you've changes the default browser you'll need to install a Chrome Browser extension called Chrometana. You can download it here.


7. Once the extension has been installed you'll see a webpage welcoming you to Chrometana and to choose your default search engine. Simply click Google here and you're all set.


Now when searching with Cortana in Windows you'll see results from Google instead. 


If you ever feel to change the search engine or remove Chrometana click  click the triple bar button in the upper-right corner of the window, select “Settings” from the drop-down menu, and then click “Extensions” in the list of items on the left side of the “Settings” tab that displays (under “Chrome”).


Sunday, January 24, 2016

Tech History: How Google got its name

We use it on a daily basis...that web page to look up an infinite amount of online information what we know as the internet. But why the name Google? 
And what in the world does the word Google mean?


Google page in 2000
Google web page in 2000 (Waybackmachine.com)


Back sometime in the late 90’s Larry Page and Sergey Brin were classmates at Stanford University and the internet was still in it's infancy. 

Bulletin Board Systems and Compuserve were out the door and making way for HTML and web pages. Larry and Sergey noted that conventional search engines ranked results by counting how many times the search terms appeared on the page. 

The two theorized about a better system that analyzed the relationships between websites and developed Page Rank. 
Page Rank determined a website's relevance by the number of pages, and the importance of those pages, that linked back to the original site. They called the technology 'Backrub' because their search engine searched through backlinks. Get it? ;-D

Believing that nobody in their right mind would invest in a technology called 'Backrub' (sounds more akin to anything related to porn than a search engine), they rename it to Google.

The name comes from a misspelling of Googol, which is the number one (1) followed by one hundred 0's.

What's "Googol" you may ask?

Well, here's a little trivia.

The words googol and googolplex were originally coined by Milton Sirotta, a 9 year old nephew of Edward Kasner a famous American mathematician. As Milton put it, googolplex was shorthand for a number that was otherwise so large you would have to write “one, followed by writing zeroes until you get tired.”

10,­000,­000,­000,­000,­000,­000,­000,­000,­000,­000,­000,­000,­000,­000,­000,­000,­000,­000,­000,­000,­000,­000,­000,­000,­000,­000,­000,­000,­000,­000,­000,­000,­000

A Googol


During yet another name brainstorming session, their friend Sean, a fellow graduate student, suggested the word googolplex.

Larry responded that he liked the smaller term 'googol', but felt like the term in general was a great fit for what they were trying to do: index an unfathomable number of Internet web pages. When Sean did a search for googol to see if the domain was available, he had accidentally misspelled it as Google. Larry realized that Sean had mispelled it but liked the word he came up with and Google was born.

How to: Removing malware, viruses and spyware

Often malware, the overall term for any virus, worms, spyware, and adware, is installed and can infect a users system without their knowledge. By the time it's realized a system is infected, a system can have constant pop-ups, is slowed to a crawl when accessing files, unable to access or even leave specific web pages, or worse... you're not even able to access the internet at all.

The steps in removing malware are standard throughout the computer industry.

1. Enter Safe Mode
On a Windows system, Safe Mode is a diagnostic tool that includes only the minimum drivers needed to boot your system safely to the desktop without any settings or problematic software interfering. Once there, you can troubleshoot further, to eliminate the problem and boot the system normally again.

The following steps apply for Windows XP through Windows 8. If you have a Windows 10 machine, check out the PC Worlds' video how to enter Safe Mode here.

   a. Turn on (or reboot) your computer.
   You can find Safe Mode in your Advanced Boot Options menu.
   b. Wait for the computer to initialize the hardware and prepare to load the operating system.
   c. Press and hold the F8 key while you wait for the Windows logo to appear. if the Windows logo appears or if the operating system begins to load, you may need to restart the computer and try again.
   d.The Advanced Boot Options screen for Windows will appear. Use the arrow keys on your keyboard to select Safe Mode, and press Return.
   e. If you need access to the Internet or network while in Safe Mode, select Safe Mode with Networking.
   f. Windows will boot into Safe Mode. When the desktop appears, it will display 'Safe Mode' in all four corners to let you know that you're in this special mode.

For Windows 10 getting to Safe Mode is a little different. Check out PC Worlds' video here.

Once you're in Safe Mode, you may find that Windows runs faster. This is usually a good indication that your system has some sort of malware or just alot of programs which are supposed to run in the background at startup.

2. Delete/Remove Temporary files
Before conducting a virus scan you'll want to remove temporary files. Doing this will speed up the scan of the antivirus software. To use the Disk Cleanup utility included with Windows, enter diskcleanup in the search bar at the Start Menu, or select Start, Programs, Accessories, System Tools, Disk Cleanup.

3. Download and install Antispyware/Antivirus software.
It's first recommended to install and run a program to remove spyware and adware first. A good tool for the job is Malwarebytes or Spybot Search & Destroy.

Then scan for antiviruses. There are a number of antivirus/antivirus software which come bundles with both antivirus, anti spyware that also scan for the entire malware spectrum. These commercial products such as Symantec or McAfee are known as 'End Point" software, are very reliable when detecting threats. Avg, Panda, and Kaspersky also provide well known products for removing viruses & spyware. The products come with a yearly subscription, however most of the companies offer a limited free version which scans for viruses only.

 Which provides the best protection? That my friends depends on who you ask. There are dozens of reviews on the internet. Just Google "Symantec vs Mcafee" ad you'll get a host of reviews comparing the two. CNET, PCworld and Techradar have some thorough reviews on antivirus/antispyware packages.

Whichever products you use, it's safe to say it's worth it to have your system stay clean and protected.

Sunday, January 3, 2016

How to: Airdroid - Transferring files from an Android device to a computer

So you got some photos or music you want to transfer from your Android phone to your Windows laptop. Or you have some important files on your Windows machine and want to safe keep them on your phone...but you can't find your usb cable!

You could go the clunky Bluetooth option or maybe even uploading the files to your online Drive account. But why go thru that hassle when you got Airdroid
Airdroid allows you to access and manage your files on your Android phone, transfer files between your phone and your computer, and share files between friends.

The greatest thing about Airdroid is that it's compatible with  a wide range of OS platforms. This includes not only Windows  (XP thru Windows 10), but Mac (OSX) and even Linux (most all distros).

To get started you will need to create a free account here. This is where you'll enter login information to access the phone app from your computer.


After creating an account, download the app at the Play Store. 

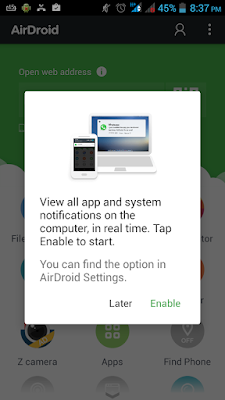
When the install is complete, open the app, and you're presented with this screen.

Here you have the option of viewing all notifications on the computer  while transferring and managing files

After enabling or disabling live notifications you'll be greeted with the Airdroid main screen. Tap the three dots in the upper right corner to access the Menu and settings. 

If you click on Settings you have a plethora of choices from changing the device name, using Wifi only (to save on cellular data), an option to use a secure Https secure connection, and many other options. At the Main screen you're presented with the web address. This is the address you want to type into your browser on your computer,

On your computer, enter the login information.

Once connected, the computer browser shows a desktop-like interface to the Android smartphone or tablet. There are numerous icons for different activities and data: Files opens up a file manager for the phone, for example. Music, Videos, Messages and Call Logs all show their respective Android data as well. Or, if your device is rooted, you can click the Screenshot icon to snap an image of the Android device remotely.


Using the various icons for data management makes it easy to wirelessly upload to the connected Android (or download from the device) any music files, videos, pictures or ringtones. You can also change the ringtone settings. And those video files on the Android tablet or handset can be watched on the larger screen of a computer too. 

Essentially, this web-based interface is a Swiss Army knife of tools for your Android. And the companion app offers the same features right on the Android device: Access to the file manager, device statistics and more.