Showing posts with label How to. Show all posts

Monday, January 26, 2026

How to: Windows 11 & 10. Tricks 101 - God Mode


There are two ways of accessing settings in Windows 11. The Settings Menu and the good ol Control Panel. It can be confusing trying to find specific settings. For example, Windows Update and Touch Screen Settings are only found in the Settings menu.

If you want an All-In-One bucket to access every setting you can imagine within Windows use what is called 'God Mode'. 

'God Mode' is a complete breakdown of the Control Panel settings.

Placing the God Mode folder on your desktop is a must for those power users who like to give Windows the ultimate tweaks and settings.


To place the God Mode folder on your desktop, ensure your user account is an administrator.
Right Click on your desktop, Click NEW, Click FOLDER.

Copy and paste this in the Folder Name:

GodMode.{ED7BA470-8E54-465E-825C-99712043E01C}

After following the step above, you will have a folder much like the Control Panel, but with a ton full more options!


Monday, January 12, 2026

How to: Four simple ways to speed up your Windows PC boot up time

So you turn on the power button to your computer....waiting for Windows to boot.....you see the Manufactures screen......then you see the Windows 11 screen.

Waiting....waiting........you go decide to make a cup of coffee.
You come back.....your desktop has appeared.....but the hourglass is showing....meaning programs are running in the background. 

OMG!! Two minutes later....."finally!!"

How often have we gone thru that?
Well....it doesn't really have to be that way. In fact, the following steps will trim your Windows boot time from a slow snail's pace to a quick rabbit on caffeine.

Disabling certain startup programs

It's a well-known fact. The longer you have a PC, the more you'll end up downloading programs and software. Some programs that automatically get stored into memory as Windows starts up, slowing the boot time. Printer programs and drivers, antivirus software...and other software.
By disabling some of these programs you can speed up Windows boot time.

1. Right-click (not left click) on the Start Menu, and click "Task Manager"
2. When the Task Manager appears, click on Startup - here is where the current programs assigned by Windows to startup automatically.
3.  Right-click on the program you don't want to start automatically and select Disable

Upgrading your hardware

A second way to speed up your Windows startup is to upgrade your system's hardware.
With desktops, your options in doing this are a little more than if you have a laptop. First, try upgrading your memory. If you have a desktop or laptop running 8gb of RAM, look into possibly upgrading to 16 or 32GB.

To see the status of your memory usage, right-click the taskbar, and select Task Manager. Click the Performance tab: In the lower-left corner, you’ll see how much RAM is in use. If under normal use, the Available option is less than 25 percent of the total, an upgrade may do you some good.


Crucial and Kingston are major PC memory providers and Crucial has a memory diagnostic tool to determine what kind of memory as well as Kingston Memory scanner.


Upgrade from a Hard Drive to a Solid State Drive

As SSDs work with flash memory (the kind that are in USB drives) they can be up to 8 times faster than standard hard drives. This speeds your Windows boot time tremendously.

See my Advantages of SSDs to Hard Drives article for more information on this.


Use Sleep instead of Shut Down

When you have finished with whatever you're doing on your PC, select Sleep instead of completely shutting the computer down.

If you choose Shut Down Windows closes all apps, programs, logs you off and closes the Windows session, and shuts down the computer.

Sleep keeps the Windows session open and uses a low power state (not shutting the PC completely) thereby starting Windows instantly.


Monday, December 8, 2025

How To: Optimize Windows Background Apps


Prevent Applications Running At Startup


We usually don't give much thought when it comes to background applications. That is until our Zoom meeting goes glitchy or we receive a error.

Startup programs are any programs that's been allowed by the user to startup when the user first logs in.

Preventing these programs from starting reduces processor load. Reducing processor load equates to a cooler running processor. A cooler running processor is..... well.... you get the hint.

You can select which apps/tasks can initially run startup. Simply click on the Start Menu.

Click Settings, then Click Apps.


Under Apps Click Startup (It's down near the bottom)


 Next, select which Applications you want to turn off OR start running when logging in.

Which apps should you keep running? 

Well..... it's recommended to keep Settings, any Printing Apps, and of course Windows Security turned on. 

Any other apps you could turn off to reduce processor time/load.

(updated 12/6/25)

Monday, October 13, 2025

How to: Using Remote Desktop Software

If you're needing technical support or assistance for a computer issue, and the tech is just too far away to be in person, often they will (or should) offer remote technical support.

Remote support is where you allow the technician access to your computer via a secure internet connection. 
The tech can then examine, diagnose and resolve your issue without having to drive to your home or business. 

Sometimes it's an easier way to go for both the customer and the tech. 

WARNING: DO not simply give remote access to any person on the phone.
Use caution and ensure you personally know the technician or person who you are talking to.

Most certified technicians are bonded and professional. 

Pay attention to the screen and what the technician or person is doing.
Scams exist where a "tech" (usually with a heavy Indian accent) will cold call you informing you that your computer has a dangerous virus and needs to be removed remotely. Be very leary of these type calls and do NOT allow remote access. Here's an example of one which occurred:
Technical support scam 

There are about a dozen remote desktop programs available with various access protocols. Some, like LogMeIn and GoToMyPC utilize a web based platform. Others such as TightVNC and TurboVNC use the Virtual Network Computing/RFB protocol.

Some programs are compatible with Windows only. Others can be used within Linux and OSX as well.

I've found that one of the best remote programs out there is Teamviewer

TeamViewer has a great user interface and is easy to navigate. 
The on-screen menus are out of the way, yet accessible.

An excellent screen-sharing and file-transfer app that can be used for business collaborations is available. There are two different versions. A licensed paid version for business and a private personal version free for noncorporate use, it gives users precisely the tools they need to share screens securely, send files with a minimum of hassle, control access rights, and even flip which user has control.
It's a secure connection and access is made by the user providing an access code and password.

I highly recommended it.

This article orig posted  02/01/20

Monday, October 6, 2025

How to: Creating and using a System Restore Point

System Restore Points give you the option of going back in time. Since Windows ME (yes...it goes back that far), Microsoft has made it available to users to create System Restore Points in Windows.

Call it an insurance policy if your system starts to go buggy and doesn't work as expected. There are two options for creating Restore Points - Automatic and Manual.


Enabling Restore Points:

1. Choose Start→Control Panel→System and Security.
Under the System link, click Create A Restore Point. You can also get to the System page by typing “System” in the Start menu’s Search box and selecting System from the results list.


2. Click the System Protection link in the left panel and ensure that the C drive Protection is turned on.

You can adjust how much disk space you want the Restore Points to use. You also have the option of Deleting a restore point. if you find you don't have enough disk space and you need to create another one.


3. Click Apply afterwards. Once you click Apply you enable Windows to create a Restore Point anytime a significant change in the operating system occurs. IE - new drivers or a Windows update is installed.


4. IF you need to create a Restore Point manually, simply click Create and give a name to the Restore Point.


Going Back In Time

Now lets say your system goes all weird on you. It's slow or certain programs freeze since your last update. You could use the "Reset This PC" option within Windows 10, but that would take some time. Instead use a System Restore Point to undo the changes that have made a mess with the Operating System.


1. After clicking Next, you'll be shown available Restore Points listed by date created and whether they were created by the system or manually.


2. You can also select Scan Affected Programs. This gives a list of all programs that have been installed since the creation of the last Restore Point.


4. Select the Restore Point and click Next and the click Finish.

Windows will then uninstall any drivers, programs, updates or registry entries after the last restore point was made.
Restore Points do not touch the User folders within Windows. All your music, photos and/or documents are not saved nor deleted. If you need to back those up, I would recommend a USB drive.

Originally posted 2/12/18

Friday, October 6, 2023

How to: Task Manager - how to use it

If you find that your system is running slow, before assuming that you have a virus or spyware, first examine what programs are running in the background.

 While it is true that a computer that is slow or freezes may be a possible indication of viruses and/or spyware, let's not jump the gun and assume that automatically.

Lets just open up Task Manager first.

Task Manager is a Windows utility that's been around since Windows 2000. It provides detailed information about background programs, processes, users logged in, services currently running or stopped, network activity as well as CPU and memory usage.

Yeah...it's a pretty decent tool.

Windows Vista Task Manager


Windows 10 Task Manager


1. How exactly do you open it up? 
There are various ways, but the easiest is holding down CTL+SHIFT+ESC. 
True, some will use the CTL+ALT+DEL, but that open up a menu with several selections including Task Manager. 
Lets just keep it simple shall we?..... CTL+SHIFT+ESC

2. When you open Task Manager up, you'll see 6 tabs....Applications, Processes,
Services, Performance, Networking, Users.
3. Click the Processes tab
4. This tab will show you what programs and processes are running in the background.
5. You can end/terminate one by RIGHT clicking and selecting End Process.

Win 11 Task manager

Now you may ask, "That's great, but which ones can I end... and why would I want to end a process?"

Those are good questions. If your computer is running slow, you may end a process here to free up memory.

Which ones should you end? 
It takes a keen eye to determine which ones exactly to end, however the ones listed as a System or Administrator process should NOT be stopped such as 'explorer.exe', 'winlogon.exe' or 'services.exe'.

'Spooler.exe' is a safe one to end only if you do not plan to print anything.

Ones like 'iTuneshelper.exe', 'Jusched.exe' or 'iPodservice.exe' are pretty safe to end as well.
The ones listed as a (your user name) usually are safe to end.

If you find any strange named processes such as "xtshbysa.exe' or 'yzghwtr.exe' chances or that you either have a virus or spyware (or both).

You'll see 'Svchost.exe' likely ALOT. This is a small executable that allows DLL's (Dynamic Link Libraries) to communicate with Windows. Many programs will use this file, however if you see one using excessive memory, end it.

One word of note: Ending ANY of the processes will not damage your computer. End any of these processes and you'll likely free up memory. At worst you 'll have to restart the computer. Ending processes in the task manager is only a temporary way of freeing up memory.

For a more permanent solution use System Configuration. I'll cover that in my next entry.

Originally Posted 03/06/2020

Monday, June 5, 2023

How to: Improving laptop battery life

Your battery on your laptop is a precious commodity. After all without it, you would have to keep your laptop plugged in constantly, defeating the purpose of 'mobility. 

And all too often users find themselves at a local Starbucks with 8% battery and no available plug! 


Here are a few steps to increase your laptop battery life.

1. Adjust your battery performance. 
This is probably the quickest and easiest way to increase your battery time.
On Windows 10 PCs clicking the battery icon will display the battery performance slider.

* The Best Performance mode is for people willing to trade off battery runtime to gain performance and responsiveness. 
In this mode, Windows won't stop apps running in the background from consuming a lot of power.

* The Better Performance setting limits resources for background apps, but it otherwise prioritizes power over efficiency.
Better Battery mode delivers longer battery life than the default settings on previous versions of Windows. (It's actually labeled "Recommended" on many PCs.)

* Battery Saver mode, a slider choice that will appear only when your PC is unplugged, reduces the display brightness by 30 percent, prevents Windows update downloads, stops the Mail app from syncing, and suspends most background apps

2. Simplify your workload:
Time is money and multitasking is wonderful, but having several programs open at once can cause the processor to work harder. Closing out unnecessary apps and programs keeps the load off the processor, and saves on battery juice.

Overheating is the biggest cause of battery drainage. The next two steps insure fan operation is efficient in cooling your laptop. And also prevent laptop shutdown due to overheating.

3. Clear the way
The most simplest is insuring your laptops fans have clear opening for air flow. No air flow means no cool air getting to the components causing the fans to work harder and places a strain on your laptop battery. Usually intake fans are on the bottom of laptops and exhaust ports on the sides. Insuring these ports are free and open for air flow will increase your battery lifetime overall.

4. Clean out your processor fan:
Overtime cooling fans gather dust. The more dust & dirt the fan accumulates, the less efficient the fan is,and it has to work harder to cool the internal components.
A fan that runs continuously full power trying to cool your laptop will kill your battery in a matter of minutes.


A simple temporary fix is to use a small hand-held vacuum to suck out the dirt from the port. (Do NOT use a household size vacuum as this may dislodge components or cables within the laptop)

For a more thorough job, this step is a little more advanced, however it's one of the most efficient to solve overheating issues.


A. First - remove the laptop battery.

B. Using a small screwdriver remove the back panel of your laptop (screw locations vary by laptop models)

C. Locate the CPU fan. Using a QTip or cotton swab, carefully clean the fan blades.

D. Using a can of compressed air, blow the excess dust from the area.

E. Replace panel and screws, replace battery and DONE!


5. Upgrade from a hard drive (HDD) to solid state (SSD). 
Hard drives contain mechanical moving parts. The spindle, the armature and the spinning platters (at 7200 rpms) actually create alot of heat. This requires the fans in your laptop to work harder thereby draining precious juice from your battery. Upgrading to an SSD can increase your battery life up to 15%. See my Advantages of SSD over HDD article for more info on this.

There you have it. Following these steps can save your laptops battery lifetime and keep your peace of mind knowing you have a little more juice left. 

Monday, February 20, 2023

How to: Task Manager - how to use it and ending processes

Processes are programs or pieces of programs running within Windows. It's normal to have a great many of them. As I write this, I have only seven running applications, but 120 processes. And Windows is running just fine.
To examine your processes, right-click the taskbar and select Task Manager (Start Task Manager in Windows 7), then click the Processes tab.
It's easier to study the long list if you sort them. To do so by name, click the Image Name column header.

You may want to sort by other columns. Click the CPU heading to see what's hogging most of the processor's attention.
You'll notice that most of the processes aren't hogging anything (or at least not enough to register). That's why you can have so many of these running and still get good performance.


If you're using XP, you may notice an outrageous hog named System Idle Process, taking up almost 100 percent of your CPU cycles. Don't worry. System Idle Process isn't actually using anything. It's just a placeholder for unused cycles. Vista and Windows 7 don't have this misleading process.

You can also sort by Memory to identify a different kind of hog.
Want to know why a particular process is up? The Image Name and Description columns should help. To make the Description column readable, expand the Task Manager window by dragging the right side of it further to the right. Then expand the Description column by dragging the edge of its header to the right, as well.

If the Description still doesn't help, visit ProcessLibrary.com and search there.

Before you kill a process, make sure that everything you're currently working on is saved to the hard drive. Then select the process and click the End Process button (Or Right-Click).
After you've read the scary warning, click the other End Process button.


Be warned: This may crash a program, but it likely will not.
If you want to keep a process from loading in the future, you'll have to identify what program loads the process, and uninstall that program.

Monday, February 6, 2023

Have Alexa call during an emergency, but not 911

Back in 2020, during the first week of April, a Michigan nursing home patient asked her Amazon Echo smart speaker for help dozens of times before she succumbed to COVID-19.


"Alexa, help me. ... I am in pain. I have to find a way to relieve it," LouAnn Dagen said in recordings found by her sister, Penny Dagen.
Penny found more than 40 recordings on her Amazon Echo that showed LouAnn asking for help in her final days.


She reportedly asked her Alexa device "How do I get to the police?" In response, the device gave directions to the nearest police station. 

Amazon Echo devices cannot contact 911 on their own.

Alexa devices can't contact 911 as they do not reliably transmit location data and a callback number in the way phones do, per FCC requirements and regulations, however there are workarounds.

Call Local Fire and Police
One way is to find out the local numbers of your police and fire departments, enter them into your contacts on your phone.

Install the Alexa App on your phone and allow it to have access to your contacts and to make calls.

When you need help and are unable to reach your phone have Alexa call your local fire dept saying the command "Alexa.... call the (your town) fire department". It may offer several phone numbers if your city is large enough, however getting someone on the line would be priority.

Install Noonlight
This is a good option if you don’t have contacts close enough to help you physically in an emergency. With this skill enabled, if you say "Alexa, tell SafeTrek to send help,” a Five Diamond Certified SafeTrek agent will send help to your home.

For more information see the website Noonlight.com

In any case, it's best to be prepared and know how to contact emergency services before the need arises.


Orig posted on April, 11, 2020

Sunday, January 15, 2023

How To: Receive text for an appointment on your Google Calendar

Years ago when you made an appointment on your Google Calendar and you had SMS notifications enabled, you would receive a text on your phone of that appointment .

This was the best thing since sliced bread in my opinion.

For some unknown reasons in 2015, Google decided to no longer offer SMS notifications for appointments on your Google Calendar. Bye Bye SMS notifications.
It was a "Why did you do that?!" moment.

But not to fret. The world is not ending....and you can still receive SMS/text messages of any appointments on your calendar.

You just have to go a round about way of setting it up. 
Basically we forward the calendar appts to Gmail.... then forwarding the Gmail as a SMS to your phone.

We'll be working on the Desktop version as it's the easiest working while in Gmail.


Phase 1

First, we want to have Google Calendar send notifications to Gmail. 
This is straightforward.
1. Inside Google Calendar, click Settings (it's the gear in the upper right)

2. Now, scroll down to your calendar and click 'Share with specific people'


3. Here you want to enter your email address.....
4. Right below you want to Add Notification.... and using the drop-down menu, select email... and then select the number of days out you want the notification to occur.

Okay... so now you're set for having Calendar forward notifications to your email. Now lets log into your Gmail where we'll forward the email you receive from Calendar as an SMS message to your phone.

Phase 2
1. Within Gmail, select settings (The gear in the upper right corner)
2. Click 'Settings' (ironic I know)
3. To add a forwarding address, click 'Forwarding And POP/IMAP'
4. Click 'Add A Forwarding Address'...
5. In the box here is where you enter your email address OF YOUR PHONE.
AT&T                 10digitphonenumber@txt.att.net
Cellular One      10digitphonenumber@mobile.celloneusa.com
Sprint                 10digitphonenumber@messaging.sprintpcs.com
T-Mobile             10digitphonenumber@tmomail.net
US Cellular         10digitphonenumber@email.uscc.net
Verizon               10digitphonenumber@vtext.com
Virgin Mobile      10digitphonenumber@vmobl.com
Follow the prompts to complete adding a forwarding address.

6. Select 'Filters And Blocked Addresses' (we have to create a filter first in order to forward it)

7. Scroll down to the bottom and click 'Create New Event'

8. In the 'From' field in the new window type  calendar-notification@google.com 
(This lets Gmail know to filter and fwd any email you get from this address)
9. Click 'Create Filter' 
10. In this window is where the magic happens..... you have several options here, but the most important is the 'Forward To' line. Use the drop down to select your forwarding phone email (We created that in Step 5)


11. Click 'Create Filter' and that's it. 
Your appointments that are in Google Calendar will be forwarded to Gmail. There Gmail will forward it to you phone as an SMS/Text message.

You may want to test it out. Create an appt within Google Calendar and open Gmail to view the email from calendar-notification@google.com. 

In a few minutes you should receive a text of the appointment. Trace the steps again if you don't get the text.
Originally published 2/18/20

Monday, January 2, 2023

How to: Accessing your router web page

Most customers I come across know an open unsecured network is an invitation for others to waltz and access your network at ease. And by saying that they realize how important it is to have a secured wifi network.

However there are some home networks I stumble across that are WIDE OPEN with no WPA security password AT ALL.

It's the electronic equivalent of leaving your front door open. 

More over may have the ability to access your documents on your laptop/desktop if file & print sharing is enabled. To prevent such an infiltration of unwanted hackers and visitors snooping around your network needs to be secure. This means setting up a password on your network via the router settings web page. 

Take a deep breath...it's fairly simple and takes about 10 minutes to do.


First determine what brand router you have. Likely it's one of the main brand one's such as Linksys, Cisco, Belkin, DLink, or Netgear. You may have to look under the router for the make/model.

Open your favorite web browser. Enter in the IP address of your router. This depends of what brand router you have, however it's very likely either 192.168.0.1 or 192.168.1.1 or 192.168.2.1. 

Answersthatwork has a great listing of IP addresses, default user names and passwords for most routers out on the market.

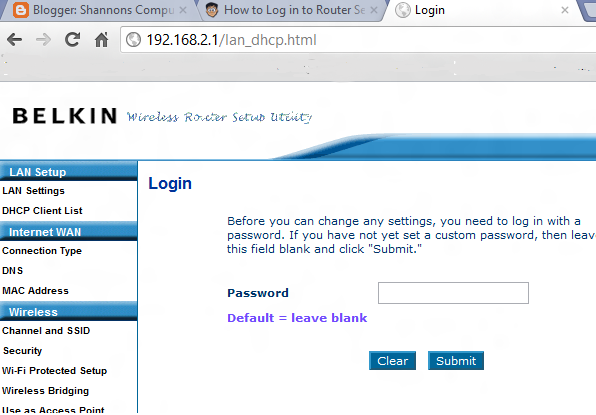
If you enter your router IP address and you're prompted for a Username and Password, that's great!! You're one step closer to accessing your router settings and securing your network.

Belkin Router Login page

Enter in the default Username and Password. This is where you may have to experiment. Some router manufactures make the default Username as Admin and Password as Admin. It may be the router manufacture name (like Belkin) and password of Admin.

Again Answersthatwork has this listing for the default usernames and passwords.


Netgear Router Settings
If you're still unable to login to the router web page, it’s possible that you may need to reset your router back to factory settings to regain access with one of the default IP address/username/password combinations above. 


That’s usually about as easy as finding a depressed button in the back of the router that’s labeled “Reset,” and pressing it with a pen for 30 seconds. try going back to step 2 above and try to log in again.

Once you've logged in successfully in the routers web page you can access several administrative settings concerning your home network. These settings include your network security and password, SSID Name (the name you give your home network), the list of current 'clients' or computers accessing your home network and other functions.

One of the first recommendations I give customers when setting up and configuring wireless networks is ensuring their network is secure with a password. That is typically found under the Security tab on the web page.

The web pages will differ slightly from one manufacture to the next. For more assistance I recommend referring to the support page of the router/modem manufacturer.


Here are a few links to popular router/modem manufactures.

Apple Airport
Belkin
D-Link
Linksys
Netgear
Western Digital

This article originally published 7/7/2012 - SL

Tuesday, February 2, 2021

How to: Change Google Assistant Voice

Originally posted on 9/9/19

We're familiar with her help and we know her voice well. She helps with scheduling appointments on your calendar, set reminders, give directions to the nearest theaters.


But did you know you can change Google Assistants voice?
Sure....the default voice is nice and professional, but it would be nice to hear a different voice.

Google Assistant debuted in May of 2016 with just one voice. Now installed on over 400 million android devices "she" is available with 6 voices, including British and Australian.

1. Open the Google App
2. Tap 'More' in the lower right corner
3. Tap 'Settings'
4. Tap 'Google Assistant'
5. Tap 'Assistant' (The second column)
6. Tap 'Assistant Voice'


You can scroll thru the colors and each color has it's own subtle tones (male and female), inflections and pace. My preference is the Australian.

There's more on the descriptions of each voice over at Android Central.

Saturday, December 19, 2020

How To: Two-Factor Authentication

Security: 

The word often makes us feel all warm and fuzzy inside.

We want to feel safe and secure. We buy security cameras when want to feel more secure in our homes. We use passwords for sensitive websites such as banking and utilities.

But just how secure is that password you use? 

Better yet, when was the last time you changed it?

Is it complicated or does it start with the word 'Password' and end with '12345'? 😀

One of the more secure ways to prevent others to try to gain access to your email and banking websites is to use "Two Factor Authentication" or 2FA.

Two Factor Authentication adds an additional layer of security to your accounts on the internet. Whether it be email, a social website, banking account or any other sensitive web page, Two Factor Authentication prevents those accounts from being hacked.

The two parts of the authentication is:

1. Your password

2. The code which the website or the application sends to your device. Such as your phone or tablet. This is the key to Two-Factor Authentication. A second electronic device.

How it works:
When you log in to a service account or webpage, you use your mobile phone to verify your identity by either clicking on a texted / emailed link or typing in a number sent by an authenticator app.


Authentication apps are the standard to receive authentication codes. Such apps as Authy and Google Authenticator.

Authy is available in multi platform OSs. Besides Android t's available in Windows, Mac, Chrome and iOS.