Sunday, January 24, 2016

Tech History: How Google got its name

We use it on a daily basis...that web page to look up an infinite amount of online information what we know as the internet. But why the name Google? 
And what in the world does the word Google mean?


Google page in 2000
Google web page in 2000 (Waybackmachine.com)


Back sometime in the late 90’s Larry Page and Sergey Brin were classmates at Stanford University and the internet was still in it's infancy. 

Bulletin Board Systems and Compuserve were out the door and making way for HTML and web pages. Larry and Sergey noted that conventional search engines ranked results by counting how many times the search terms appeared on the page. 

The two theorized about a better system that analyzed the relationships between websites and developed Page Rank. 
Page Rank determined a website's relevance by the number of pages, and the importance of those pages, that linked back to the original site. They called the technology 'Backrub' because their search engine searched through backlinks. Get it? ;-D

Believing that nobody in their right mind would invest in a technology called 'Backrub' (sounds more akin to anything related to porn than a search engine), they rename it to Google.

The name comes from a misspelling of Googol, which is the number one (1) followed by one hundred 0's.

What's "Googol" you may ask?

Well, here's a little trivia.

The words googol and googolplex were originally coined by Milton Sirotta, a 9 year old nephew of Edward Kasner a famous American mathematician. As Milton put it, googolplex was shorthand for a number that was otherwise so large you would have to write “one, followed by writing zeroes until you get tired.”

10,­000,­000,­000,­000,­000,­000,­000,­000,­000,­000,­000,­000,­000,­000,­000,­000,­000,­000,­000,­000,­000,­000,­000,­000,­000,­000,­000,­000,­000,­000,­000,­000,­000

A Googol


During yet another name brainstorming session, their friend Sean, a fellow graduate student, suggested the word googolplex.

Larry responded that he liked the smaller term 'googol', but felt like the term in general was a great fit for what they were trying to do: index an unfathomable number of Internet web pages. When Sean did a search for googol to see if the domain was available, he had accidentally misspelled it as Google. Larry realized that Sean had mispelled it but liked the word he came up with and Google was born.

How to: Removing malware, viruses and spyware

Often malware, the overall term for any virus, worms, spyware, and adware, is installed and can infect a users system without their knowledge. By the time it's realized a system is infected, a system can have constant pop-ups, is slowed to a crawl when accessing files, unable to access or even leave specific web pages, or worse... you're not even able to access the internet at all.

The steps in removing malware are standard throughout the computer industry.

1. Enter Safe Mode
On a Windows system, Safe Mode is a diagnostic tool that includes only the minimum drivers needed to boot your system safely to the desktop without any settings or problematic software interfering. Once there, you can troubleshoot further, to eliminate the problem and boot the system normally again.

The following steps apply for Windows XP through Windows 8. If you have a Windows 10 machine, check out the PC Worlds' video how to enter Safe Mode here.

   a. Turn on (or reboot) your computer.
   You can find Safe Mode in your Advanced Boot Options menu.
   b. Wait for the computer to initialize the hardware and prepare to load the operating system.
   c. Press and hold the F8 key while you wait for the Windows logo to appear. if the Windows logo appears or if the operating system begins to load, you may need to restart the computer and try again.
   d.The Advanced Boot Options screen for Windows will appear. Use the arrow keys on your keyboard to select Safe Mode, and press Return.
   e. If you need access to the Internet or network while in Safe Mode, select Safe Mode with Networking.
   f. Windows will boot into Safe Mode. When the desktop appears, it will display 'Safe Mode' in all four corners to let you know that you're in this special mode.

For Windows 10 getting to Safe Mode is a little different. Check out PC Worlds' video here.

Once you're in Safe Mode, you may find that Windows runs faster. This is usually a good indication that your system has some sort of malware or just alot of programs which are supposed to run in the background at startup.

2. Delete/Remove Temporary files
Before conducting a virus scan you'll want to remove temporary files. Doing this will speed up the scan of the antivirus software. To use the Disk Cleanup utility included with Windows, enter diskcleanup in the search bar at the Start Menu, or select Start, Programs, Accessories, System Tools, Disk Cleanup.

3. Download and install Antispyware/Antivirus software.
It's first recommended to install and run a program to remove spyware and adware first. A good tool for the job is Malwarebytes or Spybot Search & Destroy.

Then scan for antiviruses. There are a number of antivirus/antivirus software which come bundles with both antivirus, anti spyware that also scan for the entire malware spectrum. These commercial products such as Symantec or McAfee are known as 'End Point" software, are very reliable when detecting threats. Avg, Panda, and Kaspersky also provide well known products for removing viruses & spyware. The products come with a yearly subscription, however most of the companies offer a limited free version which scans for viruses only.

 Which provides the best protection? That my friends depends on who you ask. There are dozens of reviews on the internet. Just Google "Symantec vs Mcafee" ad you'll get a host of reviews comparing the two. CNET, PCworld and Techradar have some thorough reviews on antivirus/antispyware packages.

Whichever products you use, it's safe to say it's worth it to have your system stay clean and protected.

Sunday, January 3, 2016

How to: Airdroid - Transferring files from an Android device to a computer

So you got some photos or music you want to transfer from your Android phone to your Windows laptop. Or you have some important files on your Windows machine and want to safe keep them on your phone...but you can't find your usb cable!

You could go the clunky Bluetooth option or maybe even uploading the files to your online Drive account. But why go thru that hassle when you got Airdroid
Airdroid allows you to access and manage your files on your Android phone, transfer files between your phone and your computer, and share files between friends.

The greatest thing about Airdroid is that it's compatible with  a wide range of OS platforms. This includes not only Windows  (XP thru Windows 10), but Mac (OSX) and even Linux (most all distros).

To get started you will need to create a free account here. This is where you'll enter login information to access the phone app from your computer.


After creating an account, download the app at the Play Store. 

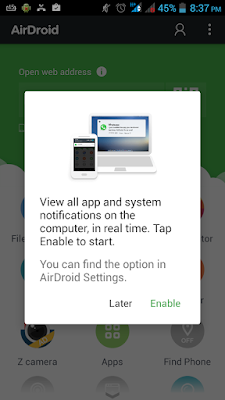
When the install is complete, open the app, and you're presented with this screen.

Here you have the option of viewing all notifications on the computer  while transferring and managing files

After enabling or disabling live notifications you'll be greeted with the Airdroid main screen. Tap the three dots in the upper right corner to access the Menu and settings. 

If you click on Settings you have a plethora of choices from changing the device name, using Wifi only (to save on cellular data), an option to use a secure Https secure connection, and many other options. At the Main screen you're presented with the web address. This is the address you want to type into your browser on your computer,

On your computer, enter the login information.

Once connected, the computer browser shows a desktop-like interface to the Android smartphone or tablet. There are numerous icons for different activities and data: Files opens up a file manager for the phone, for example. Music, Videos, Messages and Call Logs all show their respective Android data as well. Or, if your device is rooted, you can click the Screenshot icon to snap an image of the Android device remotely.


Using the various icons for data management makes it easy to wirelessly upload to the connected Android (or download from the device) any music files, videos, pictures or ringtones. You can also change the ringtone settings. And those video files on the Android tablet or handset can be watched on the larger screen of a computer too. 

Essentially, this web-based interface is a Swiss Army knife of tools for your Android. And the companion app offers the same features right on the Android device: Access to the file manager, device statistics and more.